Celebrating that today is the first day in 3 months that i don't get up and rush to the books to study i wanted to do something creative,fun and useful. Not bad for someone who feels lobotomized after yesterday's test.
Here we go.
How do you visualize surface design techniques on your weavings? This is how i do it.
My drawing skills are not very good plus it is not easy to get an accurate rendering of a project just by drawing. At least not for me. Then again what are computers good for but to make life easier?
We'll assume that we want to simulate printing or discharging on the weaving.


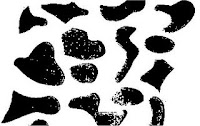
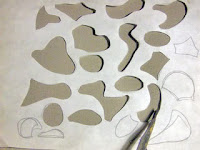
- using an exacto knife cut your stencil on freezer paper
- take a shot of the stencil with your digicam
- open your image editing program and open the stencil image
- adjust the threshold level until you get a black and white high contrast image
- if simulating discharge skip the next 2 steps, use normal mode and adjust opacity, or experiment with exclusion or soft light
- go to apply image and select the a color if needed
- use flood fill and color the negative parts


- now go to your weaving program, open the weaving and make a screenshot.
- paste the screen shot in your image editing program
- cut all the unnecessary information, just leave the weaving image
- create a new layer and paste the high contrast image
- change the merge mode and opacity until you get to your goal as a finished piece
- create as many layers as needed
- merge layers and save.
- you have now an accurate idea of how the project will look
Notes:
Because you'll be using the same stencil for the fabric the rendering will be accurate.(O.k.,o.k. there is still room for serendipity, you're dealing with handmade not industrial processes)
Merge modes that work well are either burn or underexpose because you only want to see the negative spaces. however do experiment with opacity and different merge modes until you get a simulation as exact as you want.
If your weaving has a color progression you can imitate or accentuate it by using flood fill and gradients on the weaving image layer.
Questions?
Now, isn't this a brilliant excuse for not getting away from the computer in days?
neki desu

No comments:
Post a Comment
interaction appreciated!